Choosing your first trail can feel nerve-wracking when you want a safe and enjoyable hike, not an exhausting challenge. Many beginner hikers in the United States discover that matching their fitness to the right route helps build confidence, reduce injuries, and makes the day far more fun. This article offers a clear, step-by-step guide to preparing for day hikes with safety and essential gear in mind, so you can start your outdoor journey with peace of mind and practical know-how.
Quick Summary
| Key Point | Explanation |
|---|---|
| 1. Assess Your Fitness Level | Understand your current physical condition to choose an appropriate trail that matches your hiking abilities. |
| 2. Choose Beginner-Friendly Trails | Select trails with flat terrain, short distances, and clear markings to increase your confidence and enjoyment as a new hiker. |
| 3. Pack Essential Hiking Gear | Include navigation tools, adequate water, food, and first aid supplies to ensure safety and comfort on your hike. |
| 4. Check Weather and Trail Conditions | Research up-to-date weather forecasts and trail reports to make informed decisions about your hiking plans and safety. |
| 5. Review Your Plan Thoroughly | Conduct a final check of your gear, share your itinerary with someone, and be honest about your physical readiness before heading out. |
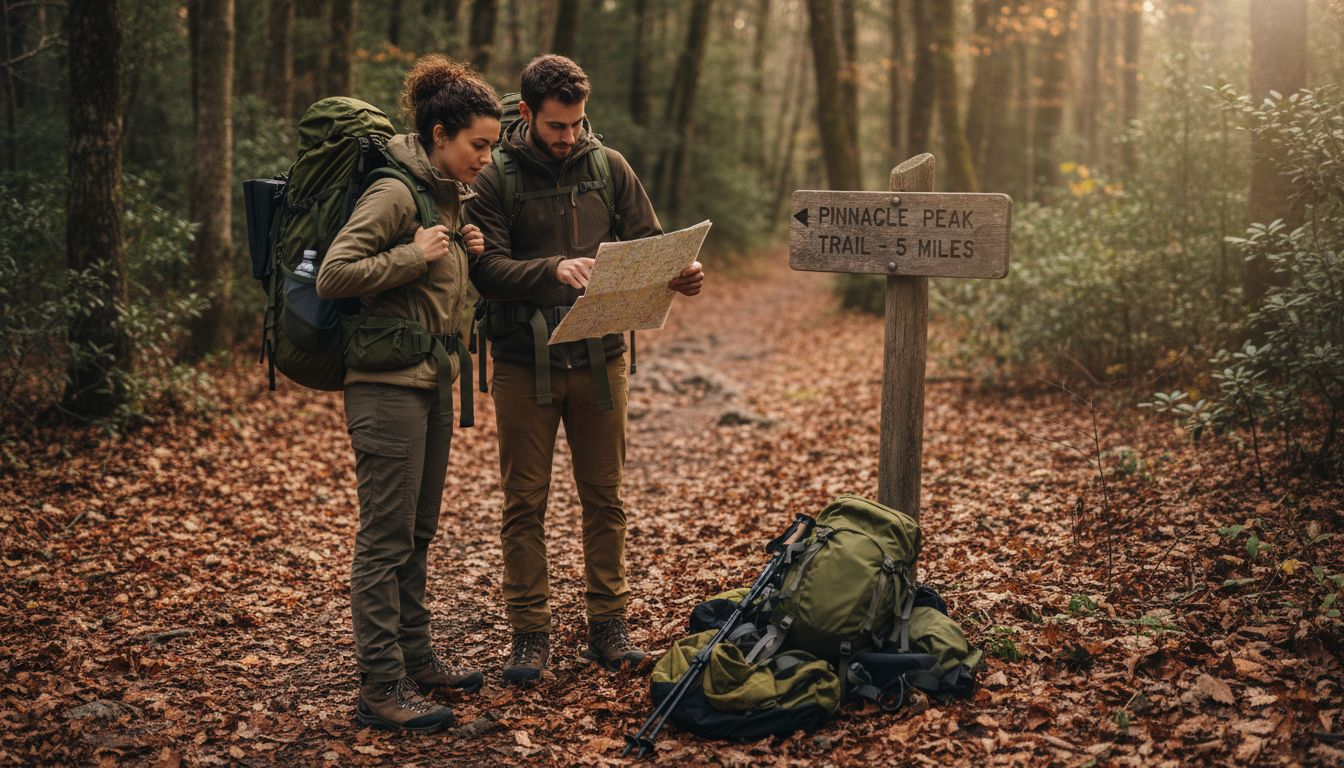
Step 1: Assess your fitness and choose your trail
Before you lace up your boots, you need to understand your current fitness level and select a trail that matches your abilities. This step prevents overexertion, reduces injury risk, and ensures you actually enjoy your first hiking experience instead of struggling through it.
Start by honestly assessing where you stand physically right now. Consider how often you exercise, your cardiovascular endurance, and your overall strength. If you're mostly sedentary, that's your starting point—no judgment. Hiking requires endurance, strength, and coordination because different terrain activates different muscle groups like your calves, hamstrings, and glutes.
Next, evaluate your hiking-specific experience. Have you walked on uneven terrain before? Do you know how your body responds to sustained activity? Your answers guide trail selection more than anything else.
Once you understand your fitness level, it's time to choose the right trail. Look for these characteristics in beginner-friendly hikes:
Here’s a quick comparison of trail features and how they affect your first hiking experience:
| Trail Feature | Beginner Impact | Risk Level |
|---|---|---|
| Flat terrain | Easy on joints and stamina | Very low |
| Steep elevation | Demanding and tiring | High |
| Short distance | Builds early confidence | Very low |
| Remote/tricky paths | Can increase anxiety | Moderate to high |
| Popular, marked trails | More support available | Very low |
- Flat or gently rolling terrain with minimal elevation gain (under 500 feet is ideal for first hikes)
- Well-maintained paths that are clearly marked and easy to follow
- Shorter distances between 2-4 miles round trip to build your confidence
- Popular trails with other hikers around in case you need help
- Loop options so you don't have to backtrack on the same route
Research trails using online resources, local hiking websites, or apps that show elevation profiles and user reviews. The elevation profile tells you everything about difficulty—a flat line means easy, steep angles mean challenging.
Starting with easier terrain and gradually increasing difficulty allows your endurance and skills to build naturally without overwhelming your body.
Check trail conditions before you go. Rain can make easy paths treacherous, and seasonal factors affect difficulty significantly. A summer trail might be completely different in spring when it's muddy.
Once you've selected your trail, walk it mentally. Imagine the distance, the terrain changes, and how your body might feel at different points. This mental preparation reduces anxiety and helps you pack appropriately.
Pro tip: Download offline maps of your chosen trail before you go, and share your planned route with a friend so someone knows where you'll be hiking.
Step 2: Gather essential hiking gear and supplies
You're about to pack your backpack with items that keep you safe, comfortable, and prepared for whatever the trail throws at you. This step transforms you from a casual walker into a prepared hiker ready for real outdoor conditions.
Start with the foundational gear every hiker needs. The American Hiking Society identifies the 10 essentials for safe hiking including navigation tools, water, food, weather protection, and a first aid kit. These items prevent emergencies and give you confidence on the trail.
Here's what belongs in your pack:
- Navigation: Map and compass (or a charged phone with offline maps downloaded)
- Water and hydration: At least 2 liters of water or a filtration method for refilling
- Food: High-energy snacks like trail mix, energy bars, or fruit that won't spoil
- Weather protection: Rain jacket, extra layers, and hat regardless of forecast
- First aid supplies: Bandages, pain relievers, blister treatment, and any personal medications
- Light source: Headlamp or flashlight with extra batteries
- Firestarter: Matches or lighter for emergencies
- Multi-purpose knife: Useful for countless trail situations
- Sunscreen and sunglasses: Protection from UV rays at any elevation
- Whistle: For signaling help if needed
Pay special attention to your first aid kit. A customized first aid kit suited for your specific trip should include adhesive bandages, antibiotic ointment, pain relievers, blister treatments, and tweezers for splinters. Customize it based on trip length, terrain difficulty, and any personal health needs.
Clothing matters more than most beginners realize. Skip cotton entirely—it retains moisture and loses insulation when wet. Instead, wear moisture-wicking fabrics like merino wool or synthetic materials that pull sweat away from your skin.
Proper gear isn't about having the most expensive equipment; it's about having the right items that match your specific hike and keep you safe.
Test your gear before hitting the trail. Wear new shoes around town to break them in. Verify your backpack's straps fit comfortably. Check that your water bottles don't leak. Small problems at home become major issues miles from your car.
Pro tip: Pack your backpack with heavier items (water, food) positioned toward the center and closer to your back, and distribute weight evenly on both sides to reduce strain and fatigue.
Step 3: Pack efficiently for comfort and safety
How you organize your backpack matters just as much as what goes inside it. Smart packing keeps your weight manageable, places safety items within reach, and reduces physical strain so you can focus on enjoying the trail.
Start by being ruthless about what actually makes the cut. Every item should serve a purpose or address a potential problem. Efficient packing requires packing only necessary items to keep your backpack weight reasonable and manageable for the entire hike.
Organize your pack strategically. Heavier items like water bottles and food belong in the center of your pack, positioned close to your back. This distributes weight evenly and prevents strain on your shoulders. Lighter items go on top or in outer compartments where they won't affect balance.
Make critical items accessible without unpacking everything:
- Top compartment or side pocket: Map, whistle, and sunscreen for quick access
- Easy reach: Water bottle (side pocket or top), first aid kit, and rain jacket
- Core of pack: Heavier items like extra food and full water bottles
- Bottom section: Insulating layers and items you won't need until later
Use packing cubes or small bags to group similar items together. Group all first aid supplies in one pouch. Bundle clothing layers in another. This organization reduces anxiety on the trail and speeds up finding what you need when you need it.
Clothing strategy prevents discomfort before it starts. Pack layered clothing you can add or remove as temperature changes. Bring an extra layer even if the forecast looks perfect—weather changes fast in mountainous terrain.
Strategic weight distribution and accessible organization transform your backpack from a burden into a tool that supports your safety and comfort throughout the entire hike.
Test your packed weight at home. Pick up your backpack and walk around for 15 minutes. Does a particular spot dig into your back? Is one side heavier than the other? Fix these issues now before you're miles from the trailhead.
Plan your snack and water strategy before hitting the trail. Know where you'll refill water and when you'll eat lunch. This prevents decision fatigue when you're tired and helps you maintain energy.
Pro tip: Place your heaviest items first when packing, then layer lighter gear on top, and keep your most-used items like water and snacks in the most accessible pockets for quick retrieval without repacking.
Use this table to quickly check if your backpack is well balanced and organized before setting off:
| Pack Zone | What to Store | Why It Matters |
|---|---|---|
| Center/close to back | Water, main food, heavy items | Reduces back and shoulder strain |
| Top/side pockets | Map, snacks, sunscreen | Fastest access on the trail |
| Bottom compartment | Extra layers, less-used gear | Keeps weight low and stable |
Step 4: Check weather and trail conditions
Weather and trail conditions change constantly, and what looked perfect on your computer screen might be completely different when you arrive at the trailhead. Checking conditions before you go is the single most important safety step many beginners overlook.
Start by consulting official sources rather than relying on general weather apps. Up-to-date trail conditions information includes details about obstacles, closures, and weather impacts that generic forecasts miss. Local hiking organizations maintain crowdsourced databases where experienced hikers report recent conditions like fallen trees, erosion, stream crossings, and wildlife activity.
Here's what to investigate before your hike:
- Current weather forecast: Temperature range, precipitation probability, and wind speed for your specific location
- Trail-specific conditions: Recent reports of mud, snow, flooding, or downed trees blocking the path
- Trail closures: Official announcements about permanent or temporary closures
- Daylight hours: Sunrise and sunset times to plan your timeline
- Mountain-specific hazards: Lightning danger, avalanche risk, or unstable snow conditions at higher elevations
- Water conditions: Stream crossings that might be dangerous during high water
Check these sources 24 to 48 hours before your hike, then again the morning you're leaving. Weather changes fast, and new conditions reports appear constantly.
Understand what conditions mean for your gear choices. A 40-degree forecast doesn't account for wind chill at elevation or how much colder it feels on a shaded north-facing slope. Rain in the valley might mean snow at higher elevations. Cold, wet conditions accelerate hypothermia faster than most beginners realize.
Informed preparation beats surprises on the trail every single time, and knowing what's coming lets you pack appropriately and adjust your plans if needed.
Make the hard call to reschedule if conditions aren't safe. A closed trail is closed for a reason. Unsafe snow conditions, dangerous stream crossings, or severe weather forecasts aren't opportunities to test your skills—they're reasons to pick a different hike for today.
Share your plan with someone at home. Tell them which trail you're hiking, what time you're leaving, and when you expect to return. This safety step means someone can alert authorities if you don't check in by your estimated return time.
Pro tip: Check trail condition reports from the past three days to spot patterns—if multiple hikers report mud or water crossings, pack extra dry socks and waterproof bags for your gear.
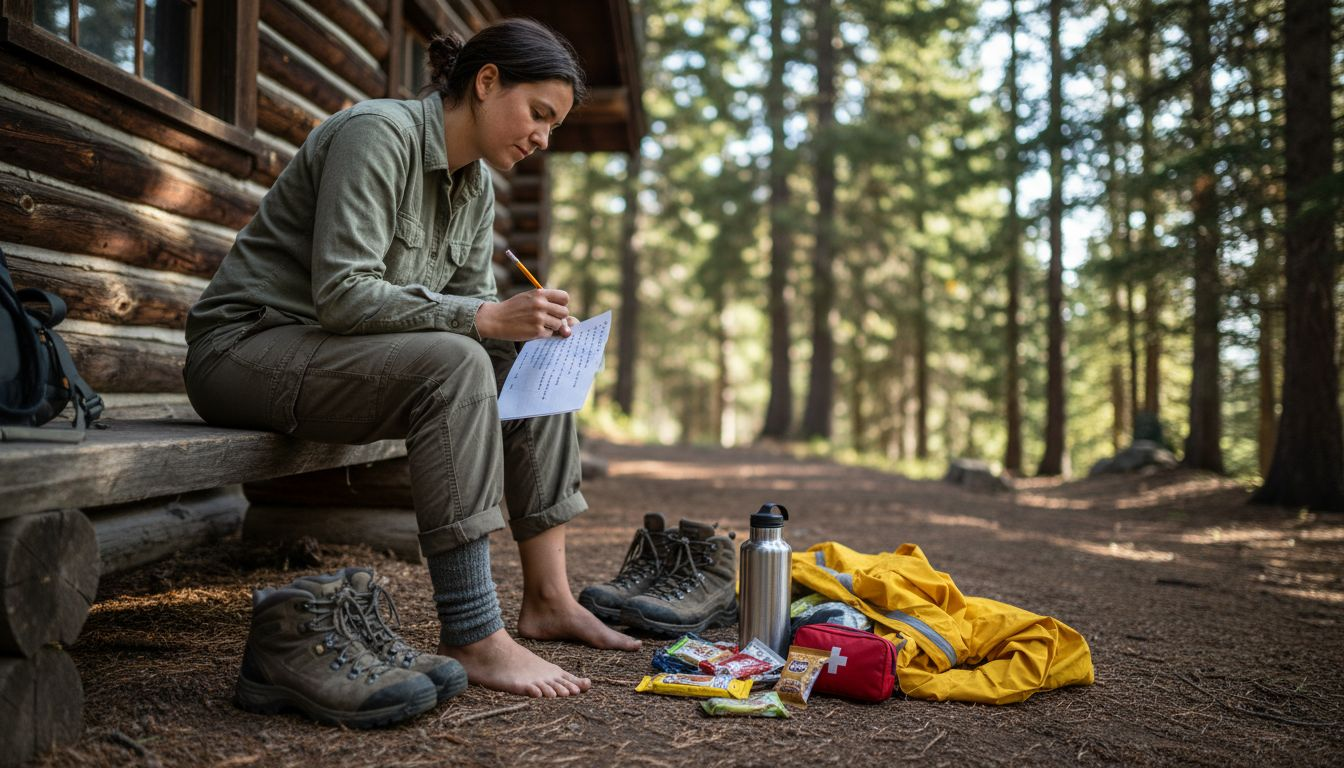
Step 5: Review your plan and verify readiness
You're almost ready to hit the trail. This final step brings everything together and ensures you haven't missed anything critical. A thorough review takes 15 minutes but prevents major problems once you're on the path.
Start by doing a physical gear check. Lay out everything you're bringing and verify each item is actually in your backpack. Don't just assume your first aid kit is there—pull it out and confirm. Check that your water bottles are filled, your phone is charged, and your map is accessible. Missing a critical item now beats discovering it miles away.
Test your gear one last time. Put on your backpack and adjust the straps so they feel snug without cutting off circulation. Verify your boots are laced properly. Check that your phone's GPS works and your offline maps downloaded correctly. Small adjustments now prevent discomfort and frustration.
Create a detailed itinerary for your hiking partner or family member. Leaving a detailed hiking itinerary with trusted contacts includes essential information they need to help in an emergency:
- Exact trail name and location with parking details
- Departure time and expected return time with a reasonable buffer
- Your contact information and emergency contacts
- Vehicle description and license plate so rescuers know what to look for
- Number of people hiking and their names
- Backup plans if trail conditions force a different route
Be honest about your physical readiness. Have you eaten a proper meal and had enough water before starting? Are you feeling good physically, or do you have nagging aches that might worsen? Proper preparation includes recognizing your physical state to prevent injury and overexertion on the trail.
Do a final weather check. Has anything changed since yesterday? Do you need to adjust what you're wearing or add different gear based on updated forecasts?
A complete plan shared with someone you trust transforms your hike from a solo adventure into a connected experience where people care about your safe return.
Set clear expectations for yourself. Know the exact turnaround time when you'll head back regardless of progress. Know your pace and how far you'll realistically travel in your available time.
Pro tip: Write your itinerary on paper and leave it on your car's dashboard so a rescuer checking for your vehicle can immediately see your planned route and expected return time.
Gear Up for Your First Hike With Confidence
Starting your hiking journey can feel overwhelming when you think about fitness levels, essential gear, and trail conditions as explained in "Prepare for Hiking Step by Step". Many beginners struggle with choosing the right equipment that matches their needs for comfort, safety, and ease of use on the trail. From selecting moisture-wicking clothing to packing a well-organized backpack, these small details make a huge difference in reducing fatigue and preventing surprises during your adventure.
At Life Camp Adventure, we understand the challenge of preparing thoroughly without the guesswork. Our curated collection of high-quality camping equipment and survival essentials is designed to support your journey every step of the way. Whether you need durable backpacks for efficient packing or weather-resistant gear to adapt to changing trail conditions, our products help transform careful planning into an enjoyable experience.
Explore beginner-friendly outdoor gear that empowers you to hike smarter with confidence.
Don’t wait to feel fully prepared. Visit Life Camp Adventure today and equip yourself with the reliable gear that makes your first hikes safe and comfortable. Start your adventure well-equipped and ready for whatever the trail brings.
Frequently Asked Questions
How can I assess my fitness level before hiking?
To assess your fitness level, honestly evaluate your current exercise habits, cardiovascular endurance, and overall strength. Consider how often you exercise and whether you have experience walking on uneven terrain to help you choose a suitable hike that matches your abilities.
What should I pack for my first hiking trip?
Pack essential items like navigation tools, water, snacks, weather protection, and a first aid kit to ensure safety and comfort on the trail. Aim to include at least 2 liters of water, high-energy snacks, and appropriate clothing layers to adapt to changing weather conditions.
How should I organize my backpack for hiking?
Organize your backpack by placing heavier items close to your back for better weight distribution, while keeping essential gear like water and a first aid kit easily accessible. Use packing cubes or small bags to group similar items together and reduce anxiety while navigating the trail.
Why is it important to check weather and trail conditions before hiking?
Checking weather and trail conditions helps you prepare for potential hazards and ensures your safety on the trail. Investigate current conditions and possible closures within 24 to 48 hours before your hike to make informed decisions about your plans.
What key points should I include in my hiking itinerary for safety?
Your hiking itinerary should include the trail name and location, expected departure and return times, your contact information, and a description of your vehicle. Share this information with someone you trust to enhance your safety during the hike.
How can I determine if I’m physically ready for a hike?
Evaluate your physical readiness by assessing your energy levels, hydration, and whether you’ve eaten a proper meal before your hike. Ensure you feel good physically and address any nagging aches that might worsen as you begin your trek.