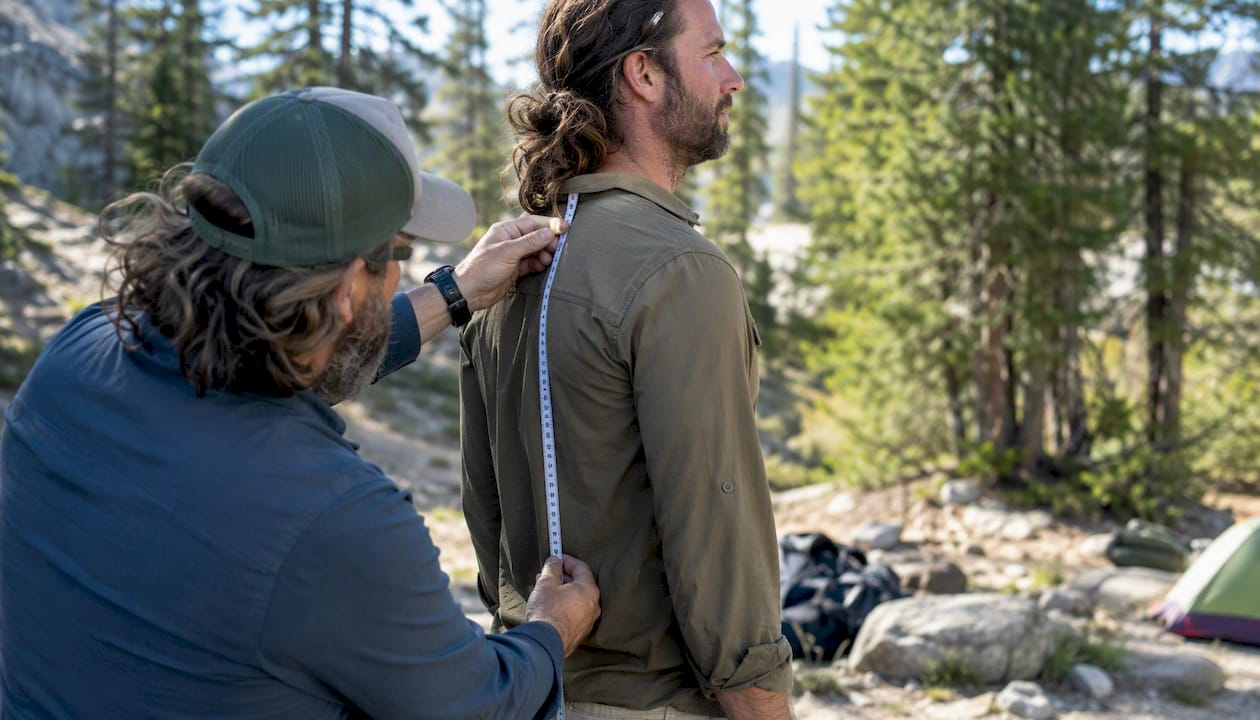
Measure from your C7 vertebra — the prominent bony bump at the base of your neck — straight down to the midpoint of your iliac crest. That distance, in inches, is your torso length, and it's the single number manufacturers use to size a pack. Grab a soft tailor's tape and a helper, stand tall, and you'll have your measurement in under two minutes. Lifecampadventure's comfortable backpacks guide walks through how that number translates to the right pack for your next trip.
Key Takeaways
Torso length from C7 to the iliac crest midpoint is the only measurement that determines backpack size — height, volume, and brand labels are secondary to that single number.
| Point | Details |
|---|---|
| Measure C7 to iliac crest | Bend your head forward to find C7, place thumbs on iliac crest, measure the distance to the nearest 0.25 inch. |
| Measure hips at iliac crest | Wrap the tape at the top of the iliac crest, not the waist, to find the correct hipbelt size. |
| Hipbelt fit takes priority | When torso and hipbelt size conflict, choose the pack where the hipbelt sits correctly on the iliac crest. |
| Test with real weight | Always try a loaded pack before finalizing; an empty pack reveals nothing about hipbelt grip or load transfer. |
| Lifecampadventure sizing resources | Use Lifecampadventure's product pages and customer support with your recorded measurements to match torso length to the right pack. |
What to gather before you measure
Getting the right tools together first prevents the most common errors. You don't need anything specialized.
Essential tools:
- Soft tailor's measuring tape — the flexible fabric kind, not a rigid metal tape. It follows the curve of your spine accurately.
- A helper — the single biggest upgrade to measurement accuracy. A friend standing behind you removes guesswork about tape angle and endpoint placement. Popular Mechanics notes that a helper and a soft fabric tape produce the most reliable torso measurement.
- Non-stretch string plus a ruler — a solid solo alternative when no helper is available. Mark the string at both endpoints, then lay it flat against a ruler.
Optional but useful:
- A full-length mirror (lets you check tape position when measuring solo)
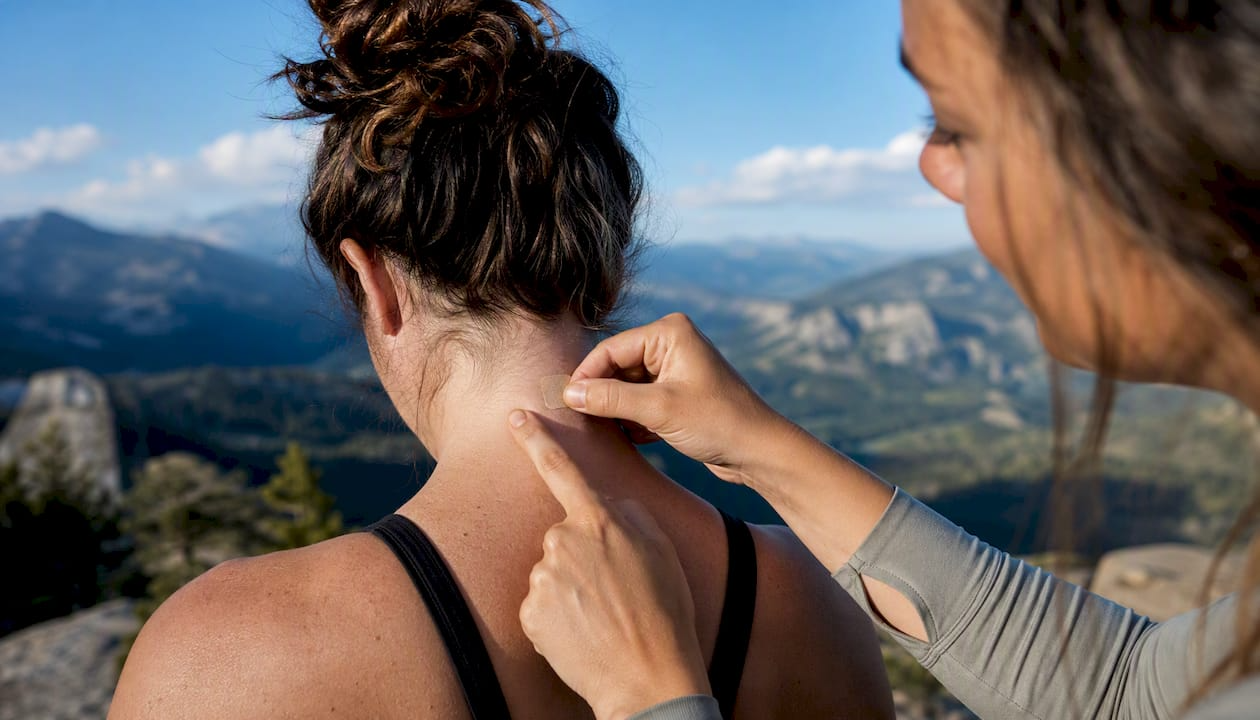
- A skin-safe marker or small sticker to mark your C7 point before measuring
- A chair or wall to steady yourself if your balance is uneven
The tape accuracy matters more than most people expect. A rigid ruler or a stretch-prone string can throw your measurement off by half an inch or more, which can push you into the wrong size category entirely.
How to measure your torso for a backpack, step by step
Switchback Travel's backpack fit guide confirms that manufacturers use torso inches as their primary sizing metric, so getting this right is worth the extra two minutes.Find your C7 vertebra. Drop your chin to your chest. Run your fingers down the back of your neck until you feel the largest, most prominent bump where your neck meets your shoulders. That's C7. Stand back up — it stays in the same spot.
Mark C7. Have your helper place a finger on C7, or press a small skin-safe sticker on it. This keeps the starting point consistent if you measure twice.
Find your iliac crest midpoint. Place both hands on your hips with your fingers pointing forward and your thumbs angled toward your spine. The shelf your thumbs naturally rest on is the top of your iliac crest. That imaginary line across your lower back is your endpoint.
Stand tall and relaxed. Breathe normally. Don't tuck your pelvis, arch your back, or pull your shoulders back. Natural posture gives you the measurement that matches how you'll actually carry a pack.
Run the tape. Have your helper hold the tape at C7 and run it straight down your spine to the line your thumbs create. Read the measurement to the nearest 0.25 inch. Record it.
Repeat once. Take a second measurement and confirm the two readings match. A half-inch discrepancy usually means the tape drifted off the spine — re-center and try again.
Solo method: Tie a string at C7 (use the sticker to anchor it), run it down your spine to your iliac crest line, mark the string, then measure the string against a ruler in front of a mirror.
Pro Tip: Mark C7 with a small skin-safe sticker before your helper steps away. If you need to re-measure for a second pack or a future purchase, you'll hit the exact same point every time.
How to measure your hipbelt position and hip circumference
Get this measurement wrong and your shoulders pay for it all day.
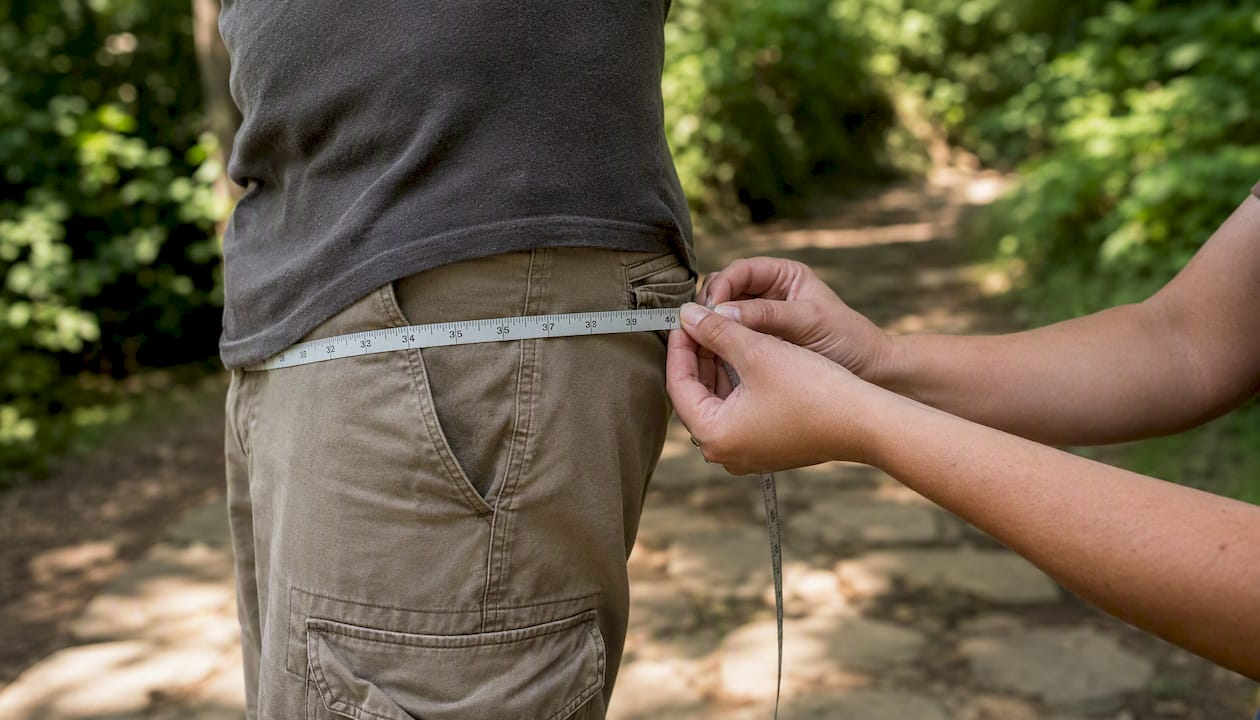
Where to measure:
- Stand with your feet hip-width apart and your hands on your hips, thumbs back.
- The top of your iliac crest — the same bony shelf your thumbs rested on during the torso measurement — is the target line. This is where the hipbelt should sit, not at your natural waist.
- Wrap the tape around your body at that line. Keep it snug but not compressed. Breathe normally and read the circumference.
Why it matters beyond comfort:
- Hip circumference tells you which hipbelt size to select when a pack offers interchangeable belts.
- If your torso measurement puts you in a medium pack but your hip circumference requires a large hipbelt, many packs let you swap belts independently.
- When torso fit and hipbelt fit conflict, prioritize the hipbelt. A slightly long or short torso can often be compensated with shoulder strap adjustment; a hipbelt that doesn't contact your iliac crest cannot transfer load no matter how you adjust it.
Pro Tip: Write down both measurements — torso length and hip circumference — and keep them in your phone's notes app. You'll reference them every time you shop for a new pack.
How to convert your torso measurement into pack size
LOJEL's backpack size guide makes an important distinction: pack volume (liters) tells you how much gear fits inside, but it does not determine whether the pack fits your body. Torso length does. A 65-liter pack comes in multiple torso sizes; picking by volume alone is how people end up with a pack that hangs off their shoulders.Most adult torso lengths fall within a typical range manufacturers use for sizing packs. Manufacturers map those inches to size labels. Manufacturers typically map torso lengths to size labels such as XS for the smallest range up to L/XL for the largest, but exact ranges vary by brand and should be verified on the specific manufacturer's chart.
When you fall between sizes:
- Try both sizes on with weight inside — water bottles work well.
- Check shoulder strap placement first: the straps should wrap smoothly around your shoulders with no gap at the top and no digging at the base.
- Then check the hipbelt: it should sit centered on your iliac crest with the buckle at your front center.
- If both sizes feel close, choose the one where the hipbelt fits better. Shoulder straps have more adjustment range than hipbelts do.
- Consider packs with adjustable torso systems or interchangeable hipbelts if you're between sizes or plan to share the pack. Switchback Travel notes that these features are specifically designed for people who fall at the edge of a size range.
For help choosing between daypack, overnight, and multi-day capacities once you have your torso measurement, the Lifecampadventure hiking backpack types guide breaks down which volume range fits which trip length.
Fit checks and adjustments after you put the pack on
An at-home measurement gets you into the right size. The adjustments below get the pack to fit your body within that size. Do them in this order — sequence matters.
Buckle the hipbelt first. Center it over your iliac crest. Tighten until it grips the bone firmly. You should feel the pack's weight shift onto your hips immediately.
Tighten the shoulder straps. Pull them until the pack sits close to your back with no gap at the top of the straps. They should wrap your shoulders, not dig into them. At this point, your shoulders stabilize the pack; your hips carry it.
Set the load lifters. The short straps running from the top of the shoulder straps up to the pack's frame should angle upward at roughly 45°. Too flat and the top of the pack pulls away from your back. Too steep and the shoulder straps dig into your neck.
Clip and position the sternum strap. Slide it to a height where it sits comfortably across your chest without restricting your breathing. Clip and tighten just enough to keep the shoulder straps from sliding outward.
Quick fit-check indicators:
- The shoulder strap attachment point should sit level with or just below the top of your shoulders — not above them.
- The hipbelt should cover your iliac crest, not your waist.
- No pinching or pressure at the base of your neck.
Pro Tip: Always test fit with weight. Fill the pack with water bottles or actual gear to approximate your real hiking load. An empty pack tells you almost nothing about how the hipbelt and load lifters will perform under pressure.
Frequent measuring and fitting mistakes and quick fixes
Most fit problems trace back to one of a handful of errors. Here's what to watch for:
Measuring from the wrong vertebra. If you measured standing straight without bending your head forward, you may have found C6 or C5 instead of C7. Fix: bend your chin to your chest, find the largest bump, then re-measure.
Measuring to the belt line, not the iliac crest. Your belt line and your iliac crest midpoint are often an inch or two apart. Measuring to your pants waistband gives a longer number and can push you into a pack that's too large. Fix: place your thumbs on the iliac crest shelf and measure to that line, not to fabric.
Tightening shoulder straps before the hipbelt. This loads your shoulders first and makes the hipbelt feel unnecessary. Fix: always buckle and tighten the hipbelt completely before touching the shoulder straps.
Symptom: neck pinching or pressure at the collar. Likely cause: torso too long for the pack, or load lifters angled too steeply. Correction: loosen load lifters slightly and check whether the shoulder strap attachment point sits above your shoulders.
Symptom: hipbelt rides up during hiking. Likely cause: hipbelt positioned on the waist rather than the iliac crest, or hipbelt too loose. Correction: re-position the belt lower on your hips and tighten until it grips bone. Also check hip circumference against the belt's size range.
Symptom: pack sways side to side. Likely cause: sternum strap too loose or missing entirely. Correction: clip and snug the sternum strap. It won't eliminate sway on its own if the hipbelt is wrong, so fix the hipbelt first.
For additional sizing reference across different pack styles, the First Rise Outfitters sizing guide covers fit resolution for sport and tactical packs where torso and hipbelt mismatches are common.
What to expect on the trail: break-in and micro-adjustments
A fit that feels perfect in your living room will shift within the first mile. That's normal, not a sign you bought the wrong pack.
Popular Mechanics' backpack fitting guide confirms that experienced hikers continuously tweak load lifters and sternum strap position throughout a day as food and water are consumed and as fatigue changes how they carry weight. Expecting to set it once and forget it is the most common beginner mistake.
A simple on-trail check routine keeps things dialed in:
After the first mile: stop and re-check hipbelt tightness. Straps loosen as materials warm up and settle. Re-tighten the hipbelt and re-set load lifters to 45°.
At midday: as food and water weight drops, your center of gravity shifts. Tighten the hipbelt slightly and check whether the pack has started to pull away from your upper back. If it has, tighten load lifters a notch.
Before and after significant descents: downhill hiking shifts load forward. Loosen load lifters slightly to let the pack follow your posture change, then re-tighten on flat ground.
How pack contents change fit: heavy items near your torso and close to your spine keep the center of gravity stable. As you eat and drink, redistribute remaining weight toward the center. The Lifecampadventure guide on how to pack a backpack efficiently covers weight placement in detail.
Pro Tip: Practice adjusting load lifters and the sternum strap while walking before your first long trip. On the trail, you want to tweak them in 10 seconds without stopping. Fumbling with unfamiliar hardware mid-hike is a real time sink.
When a store fitting or an exchange is the right call
DIY measuring works well for most people. A few situations call for more.
Signs you need an in-person professional fit:
- Persistent neck or shoulder pain after correctly setting hipbelt, shoulder straps, and load lifters
- Your hips never seem to take the load regardless of hipbelt position
- Unusual body proportions — a very short torso relative to your height, or wide hips with a narrow torso — that put you at the edge of two size categories simultaneously
What a professional fitter does: they measure your torso and hips, load the pack with weight, and adjust the suspension system while you walk. They can also recommend packs with adjustable torso lengths or interchangeable hipbelts for non-standard proportions. Switchback Travel recommends always testing a loaded pack before finalizing a purchase, which a good fitter will insist on.
Exchange guidance:
- Try the pack with real weight before you commit. Water bottles in the main compartment get you close to a hiking load.
- If you're buying from Lifecampadventure, keep original packaging and your receipt. Check the current return and exchange policy on the product page before your trip so you know the window.
- Record your torso and hip measurements now. If you need to exchange for a different size, you'll already know exactly what to ask for.
One thing most guides get wrong about pack fit
Most backpack fit guides treat the torso measurement as a one-time task — measure once, buy the right size, done. That framing misses something real.
Your torso measurement is stable, but your effective fit changes every time you hike. Load weight, fatigue, terrain, and even the time of day alter how the pack sits on your body. A pack that fits at the trailhead at 7 AM with a full load of food and water will feel different at 3 PM with half that weight gone and tired hip flexors. The measurement gets you into the right size. The adjustments keep it fitting.
The other thing worth saying plainly: height is not torso length. Plenty of tall people have short torsos and vice versa. Buying a large pack because you're 6'2" is a common and expensive mistake. The tape measure from C7 to your iliac crest is the only number that matters for sizing. Everything else — volume, weight, features — comes after you've confirmed the torso fit.
Record your measurements. Keep them somewhere you'll actually find them. The two minutes you spend measuring now will save you from returning a pack that almost fits, or worse, hiking 10 miles in one that doesn't.
Gear up with Lifecampadventure for your next trail
Getting your torso and hip measurements right is the hard part. Finding a pack built to those specs should be straightforward.
Lifecampadventure carries backpacks and outdoor gear selected for real-trail performance, with sizing resources to match your measurements to the right pack. Whether you're prepping for a weekend overnight or a multi-day route, the outdoor adventure gear collection covers packs across the full range of torso sizes and load capacities. Need help deciding between pack styles once you have your number? The how to prepare for backpacking guide pairs directly with this measurement walkthrough. Browse the full selection, check the sizing notes on each product page, and reach out to customer support with your torso and hip measurements if you want a direct recommendation before you buy.
Sources
A short list of reputable resources for visual walkthroughs, manufacturer sizing charts, and packing strategy:
- Backpack Fit and Sizing Guide | Switchback Travel
- Here’s How to Best Fit Your Backpack, According to an Avid Hiker
- The Ultimate Guide To Backpack Sizes - Backpacks Global
- Backpack Size Guide: Dimensions, Liters & Fit | LOJEL
