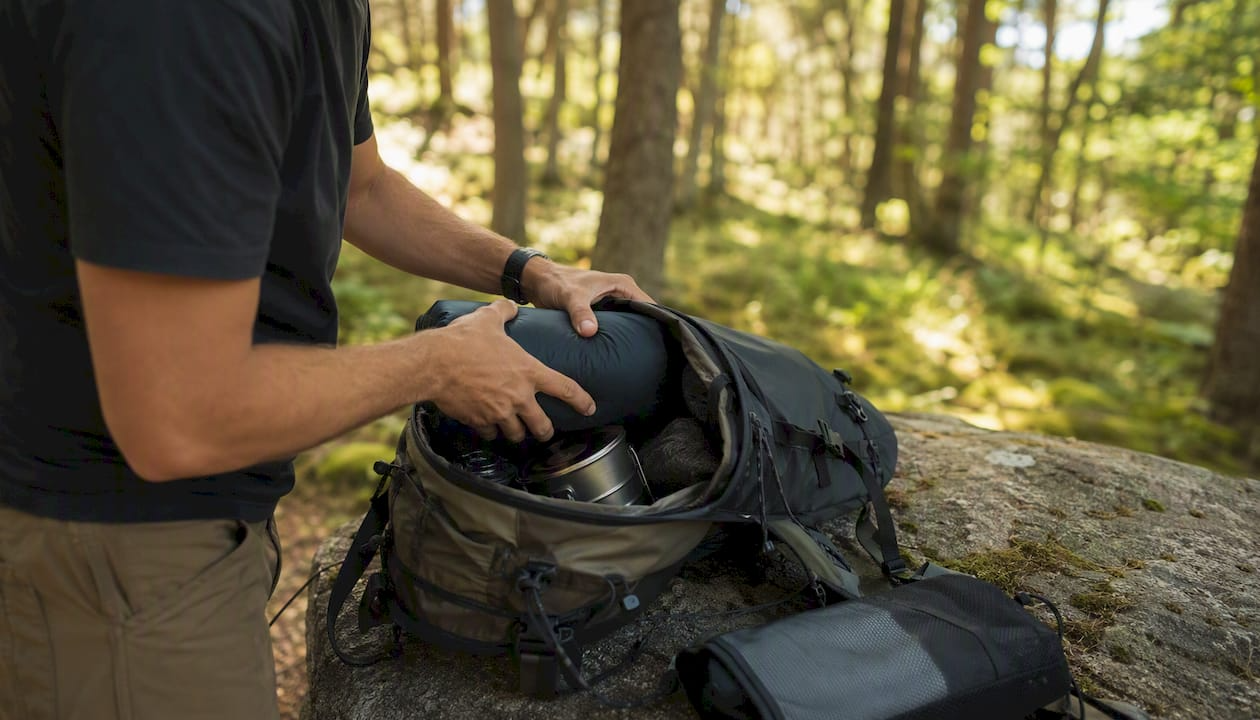
Choose your backpack size by trip length first: a daypack runs roughly small, an overnight pack medium-small, a weekend pack medium-large, a multiday pack larger, and an extended or expedition pack is the largest range. Those ranges, documented by The Pedal Project's capacity heuristics, are your starting point. Season, shelter type, and personal packing style will shift them. Before you buy anything, measure your torso length and match it to a pack in the right range.
- Day trips: water, snacks, a layer, first aid, and a phone
- Overnight: add a sleeping bag, bivy or hammock, and a small cook kit
- Weekend, 1–3 nights: full sleep system, a 1-person tent, a few days of food
- Multiday, 3–7 nights: tent, stove, bear canister, several days of food
- Extended or expedition: group gear, winter insulation, technical equipment
Pro Tip: Before you shop, stuff all your intended gear into a garbage bag or an old duffel and measure how much it holds. That number tells you your actual required liters far more accurately than any trip-length rule of thumb.
Liter numbers from different brands are not directly comparable. Manufacturers use different measurement methods, so treat published specs as practical ranges, not exact volumes. Fit matters just as much as capacity: a properly fitted 40 L pack outperforms a poorly fitted 50 L pack on every long day out.
Key Takeaways
A properly fitted pack in the right liter range for your trip length is the single most effective way to reduce fatigue and carry everything you need without overpacking.
| Point | Details |
|---|---|
| Match liters to trip length | Day: 10–25 L; weekend: 35–50 L; multiday: 50–65 L; winter or expedition: 65 L+ |
| Measure torso, not height | Find C7 to iliac crest distance; torso length determines harness size and load transfer |
| Test before you buy | Stuff all your gear into a known-volume bag to confirm required liters before purchasing |
| Size up slightly when unsure | Erring slightly larger than your measured volume prevents leaving essentials behind; compression straps handle the slack |
| Lifecampadventure packs | Lifecampadventure offers packs across the full range, from 20 L daypacks to 65 L multiday frames, matched to the suspension and fit guidance in this guide |
What does backpack capacity mean, and which size do you need?
The liter ranges above map directly to what you can realistically carry. Here is how the numbers break down across common trip types, based on Backpacker's sizing recommendations and field-tested guidance from Lifecampadventure.
| Liter Range | Trip Type | Typical Contents |
|---|---|---|
| 0–15 L | Ultra-day / summit | Water, snacks, phone, emergency layer |
| 15–25 L | Day hike | Water, lunch, rain jacket, first aid, headlamp |
| 25–35 L | Overnight / fast-and-light | Sleeping bag, bivy, cook kit, 1 day food |
| 35–50 L | Weekend (1–3 nights) | 1-person tent, sleep system, stove, 2–3 days food |
| 50–65 L | Multiday (3–7 nights) | Full shelter, bear canister, 4–6 days food, layers |
| 65–80 L | Winter / technical | Add bulky insulation, crampons, rope, extra fuel |
| 80 L+ | Expedition / group haul | Shared group gear, resupply loads, extended food |
A few practical size examples worth knowing: a small pack fits a camera, a light jacket, a hydration reservoir, and a day's food with room to spare. A medium pack comfortably holds a 1-person three-season tent, a sleeping bag in a compression sack, a small stove with fuel, and a few days of food. Larger packs provide space for additional essentials like a bear canister or extra clothing layers.
Shared group gear changes the math. When two people split a tent and a cook kit, each person's individual load drops by roughly 5–8 L. That means a pair doing a three-night trip can often manage with 40–45 L packs instead of 50 L, provided both are packing light elsewhere.
Pro Tip: Ultralight approaches can cut weekend pack size by 10–15 L. Switching from a standard three-season tent to a tarp or a cuben-fiber bivy is the single biggest volume reduction you can make.
For different backpack styles that match these capacity ranges, Lifecampadventure's trail pack guide breaks down which frame and suspension systems suit each trip type.
How do manufacturers actually measure backpack liters?
Two packs both labeled 45 L can feel dramatically different inside. The reason is that brands measure volume differently, and there is no single universal standard enforced across the industry.
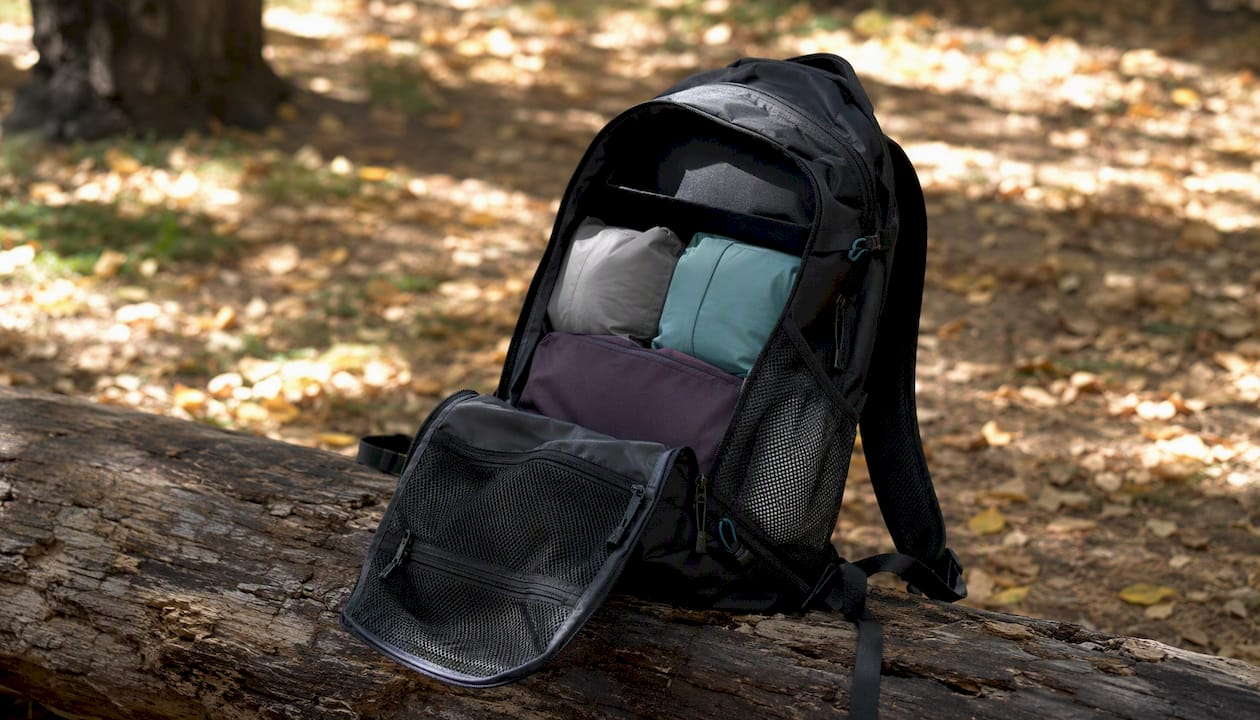
The most common method is pellet-fill: manufacturers pour polystyrene beads or similar fill material into every compartment and measure total displacement. Some brands include every pocket, including open mesh side pockets. Others count only closed, zippered compartments. A few add the volume of external attachment zones. FoxNomad's breakdown of how backpack liters are calculated documents exactly this variance, and it explains why a 45 L pack from one brand can pack out noticeably larger than a 45 L pack from another.
As SectionHiker's volume guide notes, manufacturers often list capacity in liters in product specs but may include or exclude pockets and external attachment points. When in doubt, contact the manufacturer directly and ask which compartments are counted.
Three practical checks before you buy:
- Read the spec sheet carefully. Look for a breakdown by compartment (main body, top lid, front pocket, hip belt pockets). A pack listed as "65 L (main 55 L + lid 7 L + hip 3 L)" is more trustworthy than a single undifferentiated number.
- Check roll-top and extension collar claims. Some packs list a "max" volume that includes a fully extended collar. The base volume without the extension is what you should plan around.
- Test in-store with your actual gear. Bring your sleeping bag and your largest item. If they fit with the top closure relaxed, the pack is the right size. If you are forcing the zipper, size up.
Shape matters as much as the number. A tall, narrow 40 L pack carries differently than a short, wide 40 L pack. Narrow packs keep weight closer to your spine, which improves balance on technical terrain. Wide packs are easier to load and access but can pull you backward on steep climbs.
Pro Tip: External attachment points (ice axe loops, trekking pole loops, lash points) add effective carrying capacity without adding to the listed liters. A 45 L pack with good external attachment can carry a sleeping pad, wet tent fly, and trekking poles outside the bag, freeing internal space for food and gear.
How do you choose the right backpack capacity for your trip?
Work through these decisions in order. Each one either locks in a liter range or shifts it up or down.
- Set your trip length. Use the chart above as your baseline. A three-night trip starts at 45–55 L before any adjustments.
- Identify your shelter. A tent adds 2–4 L of volume and 1–3 lbs of weight. A tarp or bivy saves both. Hut-to-hut hiking eliminates shelter entirely, dropping your needed capacity by 8–12 L.
- Check the season. Summer three-season gear packs small. Add 10–20 L for winter insulation, a four-season tent, and extra fuel. Backpacker's seasonal guidance recommends 40–50 L for standard three-season weekend trips, with ultralight approaches dropping that by 10–15 L.
- Plan your water and food. Water is heavy and bulky. If you are filtering from streams, you carry less. If you are carrying two liters of water between sources, that is 2 kg and roughly 2 L of volume before food. Multi-day food adds up fast: plan about 1.5–2 L of volume per day of meals.
- Count resupply points. A five-day trip with a resupply on day three functions like two back-to-back two-day trips. You only need to carry three days of food at a time, which can cut 8–10 L off your required capacity.
- Factor in shared gear. Splitting a tent, stove, and fuel with a partner reduces each person's load. Assign gear before you size your pack.
- Assess your packing style. Honest self-assessment matters. If you tend to bring extras "just in case," size up by 5–10 L. If you have done this before and always come home with unused gear, size down.
The measuring-bag method is the most reliable pre-purchase test available. Lay out every item you plan to bring, stuff it all into a bag or old pack whose volume you know, and see how it fits. Advnture's sizing guide recommends this approach specifically to avoid over- or under-buying. If your kit fills a 40 L bag with room to spare, a 45 L pack gives you the right margin. If it barely fits a 50 L bag, go to 55 L.
One-bag travelers have a specific rule: if you need to carry everything you own for a week or more without checking luggage, a 30–40 L pack is the practical ceiling before airline carry-on rules become a problem. Size down by packing merino wool clothing (compresses small, resists odor) and leaving behind any single-use items.
Pro Tip: Lay your gear out on the floor before packing. Anything you haven't used on the last two trips of the same type gets cut. That single habit reduces required capacity by 5–10 L for most people.
For a complete packing light strategy, Lifecampadventure's guide covers which gear categories offer the biggest volume savings.
Why torso length matters more than your height for pack fit
A pack that doesn't fit does the opposite: it loads your shoulders, compresses your spine, and makes every mile harder than it needs to be.
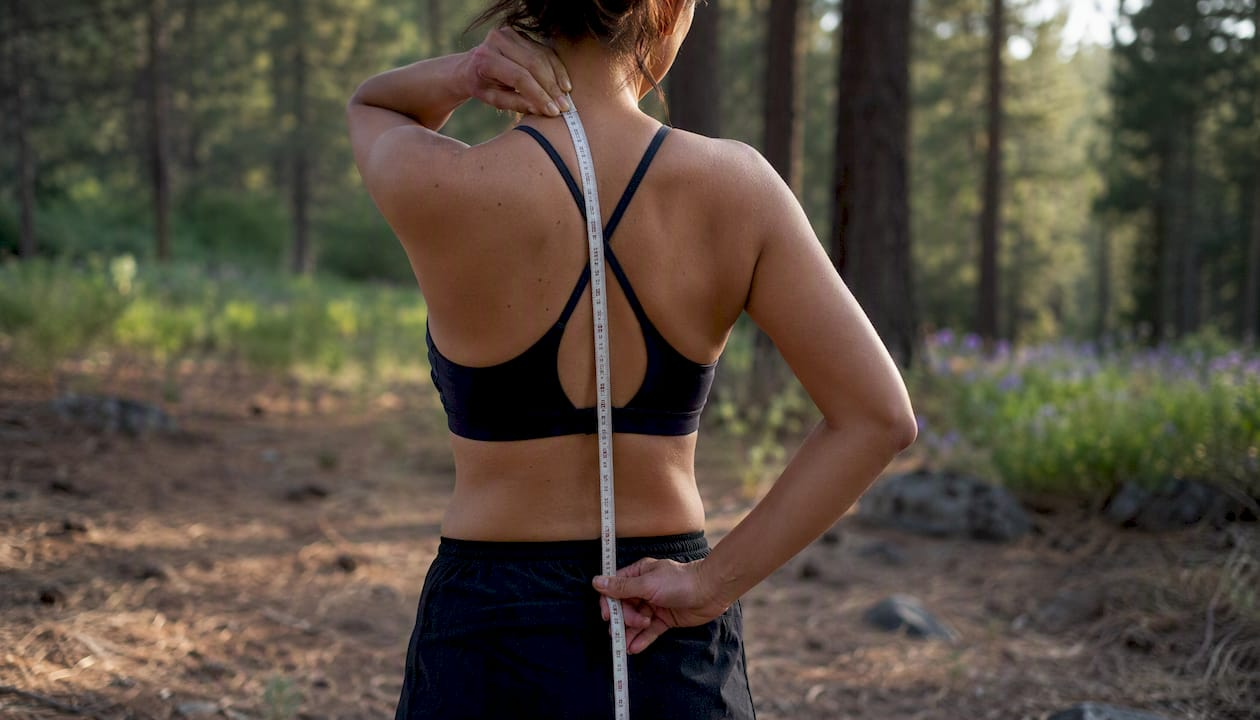
Height is a poor proxy for torso length. Two people who are both 5'10" can have torso lengths that differ by three inches, which is the difference between a small and a large harness on most packs.
How to measure your torso length:
- Tilt your head forward and find the bony bump at the base of your neck. That is your C7 vertebra, your top measurement point.
- Place your hands on your hips with thumbs pointing backward. Find the top of your iliac crest (the curved top of your hip bones) on each side.
- Draw an imaginary line connecting the two iliac crest points across your lower back.
- Measure the straight-line distance from C7 down to that line. That measurement is your torso length.
As Peak Gear Guide's fit guide explains, torso length, not overall height, determines correct harness size and shoulder strap position. Most brands size their packs as follows: under 16 inches is XS or S, 16–18 inches is M, and 18 inches and above is L or XL. Always check the brand's specific sizing chart, since these ranges vary.
Hipbelt fit is the second critical measurement. The hipbelt should wrap around your iliac crest, not your waist. When buckled, the center of the belt should sit roughly 1 inch above your hip bones. If the belt's adjustment range runs out before it reaches your hips, the pack is the wrong size for your frame regardless of the liter count.
For heavier loads, a stiffer, wider hipbelt transfers more weight. Peak Gear Guide notes that heavier base weights justify a stronger suspension and larger hipbelt, while ultralight loads allow lighter, more minimal designs.
A quick in-store fitting checklist:
- Load the pack with 15–20 lbs of weight (use sandbags or store gear)
- Buckle the hipbelt first, then the shoulder straps, then the load lifters
- Check that the shoulder straps follow your shoulders without gaps
- Verify the load lifter straps angle upward at roughly 45 degrees from the pack to your shoulder
- Walk around for five minutes and check for hot spots or pressure points
For more on comfortable pack fit and injury prevention, Lifecampadventure's fit guide covers hipbelt adjustment in detail.
Which pack features actually change how much you can carry?
Features are not just conveniences. Each one either adds usable volume, changes how weight distributes, or both. Knowing which features matter for your trip type helps you avoid paying for things you don't need and missing things you do.
Frame and suspension:
- Internal frame: Keeps weight close to your spine, better for technical terrain and off-trail movement. Most packs 30 L and above use internal frames.
- External frame: Better airflow, easier to load, and handles heavier loads well. Less common now but still preferred for expedition-weight hauls above 60 lbs.
- Frameless: Ultralight packs under 25 L often go frameless. Comfortable only with very light loads (under 15 lbs).
Access and organization:
- Top-loading: Most efficient use of internal volume. Gear stacks vertically, which keeps weight centered.
- Panel-loading (clamshell): Easier access to mid-pack gear. Slightly less volume-efficient but far more practical for travel.
- Roll-top: Adjustable volume is the main advantage. A 40 L roll-top can compress to 30 L or expand to 45 L depending on load.
Pockets and attachment:
- Hipbelt pockets add 1–2 L of accessible storage for snacks, a phone, and a lip balm. They shift the center of gravity slightly if overloaded, so keep them light.
- Side pockets sized for a 1-liter water bottle are a practical necessity on any pack above 25 L.
- A hydration reservoir sleeve adds no volume but keeps a 2–3 L bladder organized and accessible.
- External attachment points (lash loops, ice axe clips) let you carry a sleeping pad, wet gear, or trekking poles outside the pack, effectively adding 5–10 L of functional capacity.
Compression straps cinch the pack down when it is not full, preventing load shift and improving balance. They are especially useful when you are a day into a trip and food volume has dropped.
Pro Tip: A removable top lid converts many 60–65 L packs into a lighter summit pack for day hikes from base camp. That two-in-one function is worth looking for if you plan mixed-terrain trips.
For a detailed look at pack construction and ergonomics, Blvista's comparison of load-carrying styles covers how frame design affects balance across different load weights.
Special cases where standard liter ranges don't apply
Most capacity guides assume three-season hiking with standard gear. Several common scenarios push well outside those assumptions.
Winter and alpine trips:
A sleeping bag rated to 0°F packs to roughly twice the volume of a 30°F bag. Add insulated pants, a down parka, a four-season tent, extra fuel for melting snow, and crampons, and you are looking at 10–20 extra liters over your summer kit. SectionHiker's volume guide confirms that winter and alpine trips often require at least 10–20 additional liters to accommodate insulation and technical gear. A 50 L summer pack becomes a 65–70 L winter pack for the same trip length. The heavier load also demands a stiffer frame and a more substantial hipbelt.
Air travel and carry-on constraints:
Most U.S. carriers allow carry-on bags up to 22 x 14 x 9 inches, though exact limits vary by airline. A 30–35 L pack typically fits within those dimensions, making it the practical ceiling for carry-on travel. Anything above 40 L is a checked-bag risk on domestic flights. For travelers who want maximum capacity without checking a bag, a 30–35 L pack is the best compromise between volume and compliance.
Ultralight and thru-hiking:
Intentionally choosing a smaller pack forces gear discipline. Ultralight backpackers often carry 25–35 L packs for trips where a standard hiker would use 50–60 L. The trade-off is real: smaller packs compress gear tightly, which increases pressure points and limits easy-access items. To make that work, you need a sleep system under 2 lbs, a shelter under 1.5 lbs, and a cook kit under 8 oz. For the principles behind ultralight camping, Lifecampadventure's guide covers what to sacrifice and what to protect.
Expedition and group hauling:
When you are guiding others, carrying shared group gear, or resupplying a remote camp, 65 L is a floor, not a ceiling. Expedition packs commonly start at 80 L and can run to 100 L+. Before committing to a pack that large, consider whether renting or using a resupply cache is more practical for your specific trip.
Pro Tip: For international travel, check your specific airline's carry-on policy before you pack. Dimensions and weight limits vary significantly between carriers, and a pack that fits on a U.S. domestic flight may be gate-checked on an international leg.
Lifecampadventure-tested packing tips that actually change your day
Packing order is not a preference. It is a physics problem. Where weight sits in a pack determines how the load transfers to your hips and how stable you feel on uneven ground.
The right packing sequence:
- Place your sleeping bag or heaviest compressible item at the bottom of the main compartment, compressed into a stuff sack.
- Heavy, dense items (food, bear canister, water filter, stove) go in the middle of the pack, as close to your spine as possible.
- Medium-weight items (clothing, cook kit) fill around the heavy core.
- Light, bulky items (puffy jacket, rain gear) go at the top for easy access.
- Frequently needed items (snacks, headlamp, map, first aid) go in the top lid or a front pocket.
This sequence keeps the center of gravity high and close to your back, which reduces the lever arm pulling you backward. Lifecampadventure's packing method guide covers the mechanics of load placement and how proper technique reduces fatigue.
Field-tested tips from Lifecampadventure:
- Use compression sacks for your sleeping bag and down jacket. They reduce volume by 30–50% and make those items easier to position in the pack.
- Treat your hipbelt as the primary load carrier. Once the belt is buckled and seated on your iliac crest, tighten the shoulder straps just enough to keep the pack from swaying. Over-tightening the shoulder straps defeats the purpose of the hipbelt.
- Fill dead space. Stuff socks inside your cook pot, pack your rain jacket around your water filter, and use every cubic inch of your side pockets.
- Keep your pack's total weight under 20% of your body weight for day hikes and under 30% for multiday trips. Above those thresholds, fatigue compounds quickly.
The most common packing mistake is treating the pack as a suitcase. A well-packed backpack is a system: every item has a place based on weight, access frequency, and weather risk. When you pack that way, a 45 L pack carries as comfortably as most people's 55 L packs.
Diagnosing load shift on a shakedown hike:
Pro Tip: Take a 20-minute shakedown walk before any real trip. If the pack sways side to side, your load is not centered. If it pulls backward, your heavy items are too low or too far from your spine. Adjust before you hit the trail.
For a full packing checklist covering gear organization by trip type, Lifecampadventure's packing tips guide is the practical companion to this capacity guide.
The case for starting smaller than you think you need
Most people buy too much pack. The logic feels sound: a bigger pack means more flexibility, more room for extras, more comfort. In practice, a pack that is too large for your kit creates the opposite problem. Gear shifts inside the bag, the pack sways, and you end up stuffing in extras you didn't plan for just to fill the space.
The trip-length ranges in this guide are starting points, not ceilings. A disciplined packer doing a three-night summer trip can often manage with 40 L. A first-timer doing the same trip with borrowed gear might need 55 L. Neither answer is wrong. What matters is that you test your actual kit before you buy, measure your torso before you commit to a harness size, and treat the liter number as a practical range rather than a precise specification.
The measuring-bag method is the most honest tool available. It bypasses every marketing claim and tells you exactly what your gear requires. Pair that with a proper torso measurement, and you have the two inputs that matter most in any backpack capacity guide.
Lifecampadventure packs built for the ranges in this guide
Choosing the right liter range is only half the work. The other half is finding a pack whose suspension, fit, and features match how you actually use it.
Lifecampadventure carries packs across the full range covered in this guide: daypacks in the 20–25 L range for trail days and travel, weekend packs in the 40–50 L range with full internal frames and load-transfer hipbelts, and multiday packs in the 55–65 L range built for three-season conditions. Each pack is selected for durability, compression options, and the kind of suspension that actually moves weight to your hips rather than your shoulders.
Before you order, use the measuring-bag method from this guide to confirm your required liters. Then check the brand's torso sizing chart and measure your C7-to-iliac-crest length. If you are between sizes, size up and use the compression straps to dial in the fit.
Browse the full outdoor gear selection at Lifecampadventure, or check the camping gear comparison to see how packs pair with tents, sleep systems, and cook kits for complete trip setups. Pick your liter range, confirm your torso size, and order with the shakedown hike in mind.
Sources
The sources below back the specific claims and charts in this guide.
- An Essential Guide to Backpack Sizes and Volumes — The Pedal Project
- What Size Hiking Backpack Is Right For You? — Backpacker
- Understanding Backpack Volume: A Guide to Sizing — SectionHiker
- How to Choose Your Backpack Size (2026) | Peak Gear Guide
